
How to Do a Door Lock Change
Door lock replacement is an easy and inexpensive way to improve your home security. This process isn't for everyone. It requires a certain amount of patience and skill.
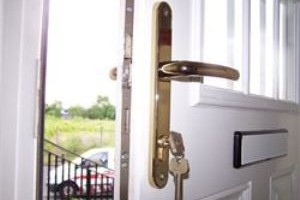
It is necessary to replace the cylinder, which is inside the knob's body. The cylinder is responsible for recognizing the key as it is inserted in the lock.
Removing the old lock
The first step in replacing the door lock is to get rid of the old one. It's a straightforward process, however it is important to keep a few things in mind. Make sure the new lock is compatible with your door. This will ensure that it fits snugly and doesn't create a gap around the deadbolt plug or latch.
After removing the latch plate, you will have to look for two screws or bolts on the inside of the casing that hold the casing to the two halves of the lock. Remove them with a screwdriver and then pull the lock out of the door. If you have a mortise lock there could be a set screw at the base of the handle, which binds it to the spindle. Make use of a screwdriver for removing this screw, then remove the doorknobs.
Take the deadbolt and latch plug from your door jamb. Install RepairMyWindowsAndDoors . If you are replacing a mortise lock you should also measure the distance between the lock case and the door's edge to ensure that your new lock will fit.
It is possible to replace your lock for a variety of reasons, for instance, the possibility that someone else has the key or you've a new roommate. You can save money by deciding to take the lock off yourself instead of hiring a professional. The process is simpler than most people think, and it can be completed in a few minutes.
Start by removing the handle and trim from your door. With a flat screwdriver pry off the trim. You should be able twist off the majority of it. In some instances you might be able to take off the handles completely. The next step is to look for a hole on the inside of the handle and insert straightened clips into it. This will trigger the release mechanism, allowing you to remove the handle. The next step is to look at the interior side of the lock for another small tab and press it using a flat screwdriver. After the spindle is removed, you are able to remove the cylinder and the housing.
Making a decision on a new locking system
When it comes to selecting a new lock, you have many choices. Think about the various kinds of locks and pick one that is in keeping with the design of your door. Consider the backset (the distance between the edge of the door and the center of the lock hole) and the cross bore (small hole in the frame of the door frame). Also, make sure to select a lock that is able to accommodate the door's thickness as well as swing.
The majority of door locks are assessed by BHMA and the American National Standards Institute to give you an idea of how well they will withstand use and how difficult they are to pick or disable. A lock of grade 3 could be perfect for a quiet apartment complex in the countryside, whereas locks that are grade 1 might be more suitable for a busy street near the storefront.
Most smart door locks require a digital code to open. If you're worried about hacking or other security issues, consult with a professional locksmith or the local police department for advice.
Replace the cylinder
It is easy to replace a damaged or broken door lock cylinder with a simple DIY project. It is crucial to choose the right cylinder and follow the instructions. The first step is to remove the knob or handle, if there is one and then remove the trim that is attached to the base of the lock cylinder with a screwdriver. After the trim is removed, you will be able to access the screws that keep the cylinder in place and remove them using a flathead screwdriver. The cylinder can then be gently removed from the door.
Before installing the new cylinder, be sure that it's the right length for your door. Find the distance from the center to the right and left sides of the cylinder with a tape measure. Buy a new cylinder that has the same measurements. This will prevent cylinders from snapping when the door is hit or the key is stuck inside.
If you have a replacement cylinder, insert it in the door and turn the key. This will align the cylinder with the carriage that is usually located on the outside of the lock. After that, you can loosen the set screw, which should be a few turns inside the head. If there is a screw on the outside of the case that is holding the door, you'll need to remove it.
After removing the lock cylinder, you can replace it with a new lock by sliding the new cylinder into the case and tightening the set screw. Reinstalling the piece that connects the cylinder to an indicator stem for a lock is also essential. You can do this by pulling three small tabs at the back of the cylindrical using needle-nosed pliers. Then, you'll be able to attach the smaller bracket to the back of the cylinder. Then, you need to put back in the strike plate and latch plate, as well as the retaining ring that is attached to the top lock cylinder.
Installing a new lock
Begin by measuring the door's width if are replacing an existing lock. The majority of residential locksets have a thickness of 3/8 inch to 1 3/4 inches. If your door is thicker you will require a thick door kit that includes longer screws as well as a longer tail piece (for door knobs) or spindle extensions (for deadbolts).
Most locks come with comprehensive instruction booklet that will help you install the new hardware. Be sure to read the instructions thoroughly prior to beginning the process to make sure that you are following all the steps. The manual will also give you an idea of the level of skill required to accomplish the task. If you're replacing a lock for the first time, you may need to seek out an experienced person for help.
It's a great idea to tape the openings in the old hardware before installing the new lock. This will prevent the screws from falling out of the holes, and will safeguard any tile you may have put in the area. It will also prevent any potential damage from rust, dirt, and grime. SECURAM Touch comes with a strip painter's tape designed to be used for this purpose, but you can also use gaffer's or masking tape when you have it.
After you have removed the screws holding the inside of the lock section to the outside side immediately, pull it back. It is important to do this swiftly so that the lock doesn't end up closing itself in a way that could end up damaging the mechanism.
Install the new latch bolt into the upper cross bore of the new lock, if it comes with one. Make sure you put it in the correct position, which will be marked by an arrow. Next, fit the latch plate on top of the bolt and secure it in place.
Finally, screw the deadbolt and strike plate into the door jamb. Test the deadbolt a few times by throwing it to ensure it is extending into the strike plate. Follow the directions included with your electronic smart lock to program it. This involves downloading an app and entering your email address, verifying your identity, and then connecting to the wireless network to connect your device.